The Vegetative Stage Optimization Guide: Faster Growth, Stronger Plants
Table of Contents
- Introduction
- Growth Stage Deep Dives
- Understanding the Vegetative Stage Timeline
- Vegetative Stage Nutrient Calculator
- Nitrogen-Rich Nutrients for Maximum Growth
- Essential Pruning Tools and Techniques
- Nutrient Optimization for Peak Performance
- Common Issues and Solutions
- Conclusion
- FAQ
Introduction
The vegetative stage represents the most critical foundation of any successful hydroponic growing operation. This is when your plants develop the robust root systems, strong stems, and abundant foliage necessary to transition into flowering and produce impressive yields. Unlike soil growing, hydroponic systems accelerate vegetative growth by 20-30%, meaning you can achieve optimal plant development in dramatically less time.
Whether you’re cultivating leafy greens destined for harvest in 3-4 weeks or training long-term fruiting plants like tomatoes and peppers, understanding how to maximize the vegetative stage transforms your entire growing operation. This comprehensive guide reveals the exact strategies, nutrient ratios, pruning techniques, and optimization methods that separate average growers from exceptional ones.
The vegetative stage isn’t just about growing bigger plants—it’s about engineering the ideal foundation for everything that comes next.
Affiliate Disclosure: This article contains affiliate links. If you purchase through these links, soilfreeharvest.com may earn a small commission at no extra cost to you.
Growth Stage Deep Dives: Understanding Plant Development Phases
Before diving into vegetative optimization, let’s establish exactly where the vegetative stage fits within the complete plant lifecycle.
The Complete Plant Growth Timeline
Every hydroponic plant progresses through predictable growth stages, each with distinct nutritional requirements and environmental needs:
Germination Stage (1-7 Days)
This initial phase begins the moment seeds contact moisture. Under optimal conditions with temperatures between 70-85°F and humidity around 80-90%, most seeds germinate within 24-72 hours. Once tap roots emerge 1/4 to 1/2 inch long, seeds are ready for planting in your chosen growing medium. Germination success depends entirely on proper moisture and temperature conditions.
Seedling Stage (2-3 Weeks)
Following germination, seedlings develop their first true leaves and establish initial root systems. This fragile phase requires moderate lighting—typically 16-18 hours daily—to prevent stretching while encouraging healthy development. Young seedlings show rapid daily growth, often adding new leaf sets every few days under optimal conditions. Most seedling stage plants remain small and require gentle handling to avoid stress.
Vegetative Stage (3-16 Weeks)
This stage defines plant architecture and size. Depending on your growing goals and space constraints, most indoor growers maintain vegetation for 4-8 weeks. During optimal conditions, plants can double in size weekly. This stage offers maximum flexibility—you control exactly how long plants remain vegetating based on desired final size. Hydroponic systems produce notably faster vegetative growth than soil, often completing this phase 20-30% quicker than traditional methods.
Flowering/Fruiting Stage (6-12 Weeks)
Once triggered by light schedule changes (typically 12-hour light/dark cycles for photoperiod plants), plants redirect energy from foliage development to reproductive growth. This stage culminates in buds, flowers, fruits, or seeds depending on your plant species. Plants mature fully within this window, ready for harvest once all reproductive structures reach peak development.
Photoperiod vs. Autoflowering Growth Timelines
Understanding your plant genetics fundamentally changes vegetative management strategy.
Photoperiod Strains (14-24+ Weeks Total)
Photoperiod plants require specific light schedules to trigger flowering. These strains offer complete grower control over vegetative duration, though they require longer overall growing times. Most photoperiod growers vegetate for 4-8 weeks before switching to 12-hour light/dark cycles. Experienced growers often extend vegetative periods to 12+ weeks for larger plants and maximum yields, especially when growing fewer plants in larger spaces.
Autoflowering Strains (8-12 Weeks Total)
Autoflowering plants automatically transition from vegetative to flowering based on age rather than light schedules. These strains complete full lifecycles much faster than photoperiod varieties, typically with only 2-4 weeks of vegetative growth. Autoflowering genetics enable multiple harvests per year and work excellently for growers seeking faster results and simpler growing schedules.
Real-World Vegetative Growth Examples in Hydroponics
Leafy Greens and Herbs (Fastest Harvest)
- Germination through harvest: 3-4 weeks total
- Vegetative period: 3-4 weeks
- Plants reach full maturity quickly in optimal hydroponic conditions
- Perfect for beginners seeking rapid results
Fruiting Plants (Moderate Timeline)
- Germination through first fruit: 8-10 weeks
- Vegetative period: 4-8 weeks (depending on desired size)
- Plants establish robust structure before flowering
- Requires more precise nutrient management than leafy greens
Large Format Plants (Extended Timeline)
- Germination through mature harvest: 12-16+ weeks
- Vegetative period: 8-12+ weeks
- Allows development of multiple fruiting branches
- Maximizes yields but requires more space and resources
Understanding Vegetative Stage Optimization
The vegetative stage succeeds or fails based on five core optimization factors working in harmony:
1. Light Duration and Intensity
Plants remain in vegetative growth as long as they receive long days. Most indoor growers provide 18-24 hours of daily lighting during this phase, with 18-6 (18 hours light, 6 hours dark) being most common for energy efficiency and 24-0 (continuous light) used for maximum vegetative acceleration.
Light intensity matters equally. Full-spectrum LED grow lights with balanced wavelengths and PPFD (Photosynthetic Photon Flux Density) values of 400-600 µmol/m²/s provide optimal photosynthesis rates. Higher PPFD values (800-1200 µmol/m²/s) accelerate growth but increase energy costs. Lower intensities extend required light hours but reduce overall electrical expense.
2. Temperature and Humidity Management
Optimal vegetative growth occurs between 70-75°F with relative humidity between 50-70%. Temperatures outside this range slow metabolism and nutrient uptake. High humidity above 80% promotes mold and mildew in hydroponic environments, while humidity below 40% stresses plants and increases transpiration demands.
3. Air Circulation and CO2 Levels
Proper air circulation prevents localized humidity pockets and strengthens plant stems. Moving air also delivers fresh CO2, which increases photosynthesis rates. Ambient CO2 levels around 400 ppm support normal growth, while 1000+ ppm dramatically accelerates photosynthesis when combined with high light intensity—though this requires sealed growing environments and careful management.
4. Nutrient Solution Management
This receives detailed coverage below, but vegetative plants require specific nutrient ratios emphasizing nitrogen for foliage development. Maintaining correct electrical conductivity (EC), pH, and nutrient balance directly determines growth speed and plant health.
5. Water Oxygenation and pH Control
Hydroponic roots demand constant oxygen access. Dissolved oxygen levels should remain above 6-8 mg/L. pH management ensures nutrient availability—most hydroponic plants thrive between pH 5.5-6.5, where all essential elements remain bioavailable.
Vegetative Stage Nutrient Calculator: Finding Your Plant’s Perfect Feed Schedule
Understanding EC, PPM, and Nutrient Strength
Before calculating specific nutrient amounts, you must understand how to measure nutrient solution strength.
EC (Electrical Conductivity)
EC measures the concentration of dissolved nutrients in your solution, expressed in milliSiemens per centimeter (mS/cm). High EC indicates strong nutrient solution (potentially causing root burn), while low EC means weak solution (potentially causing slow growth). EC is preferred over PPM because it more accurately reflects available nutrients regardless of which specific fertilizers you’re using.
PPM (Parts Per Million)
PPM estimates the total dissolved solids (nutrients plus salts) present in your hydroponic solution, expressed in milligrams per liter. While commonly used, PPM is less precise than EC because it doesn’t account for which specific nutrients are present—just total dissolved solids.
The Practical Relationship
Approximately 1 mS/cm EC = 500-700 PPM, though this varies based on your specific nutrient formulation. Most hydroponic growers today use EC meters rather than PPM because EC provides superior accuracy.
Vegetative Stage Nutrient Targets by Plant Type
Different plants require dramatically different nutrient concentrations during vegetation:
Leafy Greens (Lettuce, Spinach, Kale)
- Target EC: 1.2-2.0 mS/cm (600-1400 PPM)
- Light feeders requiring moderate nutrient concentrations
- Risk of bitterness if fed too aggressively
- Fresh harvests maintain this steady, moderate feeding
Herbs (Basil, Parsley, Mint)
- Target EC: 1.0-1.8 mS/cm (500-1260 PPM)
- Similar to leafy greens with slightly lower requirements
- Over-fertilization diminishes flavor complexity
- Frequent harvesting maintains constant feeding
Young Vegetative Plants (Seedlings, Early Veg)
- Target EC: 0.5-0.8 mS/cm (250-560 PPM)
- Drastically reduced from mature plant levels
- Young plants cannot tolerate full-strength solutions
- Low EC prevents root burn during critical establishment phase
Mid to Late Vegetative Stage (4+ weeks)
- Target EC: 1.2-2.0 mS/cm (600-1400 PPM) for fruiting plants
- Target EC: 800-1200 PPM measured in older resources
- Higher nitrogen emphasis compared to flowering
- Gradually increase as plants mature and root systems expand
Advanced Vegetative Stage (Pre-Flowering)
- Target EC: 1.2-1.8 mS/cm (600-1260 PPM)
- Maintain elevated nitrogen while increasing potassium
- Begin transitioning nutrient ratios toward flowering needs
- Monitor for nutrient deficiencies as growth accelerates
The Vegetative NPK Ratio Framework
Nitrogen, Phosphorus, and Potassium form the backbone of vegetative nutrition. Understanding ideal ratios allows you to calculate exactly how much of each element your plants need.
Early Vegetative Stage NPK Ratio: 2:1:3 (N:P:K)
- Example: 20-10-30 fertilizer formulation
- Emphasis on nitrogen and potassium for foliage and structure
- Moderate phosphorus supports early root development
- Use for approximately 3-4 weeks after seedling stage
Mid to Late Vegetative Stage NPK Ratio: 4:2:3 (N:P:K)
- Example: 40-20-30 fertilizer formulation
- Significantly increased nitrogen for aggressive foliage expansion
- Moderate phosphorus and potassium for balanced growth
- Use for remaining vegetative period until transition
Balanced General Purpose NPK Ratio: 1:1:1 (N:P:K)
- Example: 20-20-20 fertilizer formulation
- Less specialized, works across most vegetative timeframes
- Not optimized but acceptable if specific ratios unavailable
- Suitable for mixed plantings with varying nutrient needs
Alternative High-Nitrogen Options: 5:1:1 or similar
- Used by some advanced growers during peak vegetative growth
- Maximizes foliage production in final weeks before transition
- Risk of excess nitrogen toxicity if not carefully managed
- Requires experience to implement successfully
Step-by-Step Nutrient Calculator Method
Here’s how to calculate exact fertilizer amounts for your specific setup:
Step 1: Determine Your Tank Volume
Start with your actual reservoir size in liters. If you maintain a 50-liter reservoir, that becomes your baseline.
Step 2: Choose Your Target EC or PPM
Select your target nutrient concentration based on plant type and growth stage (see above ranges). Let’s say you’re growing mid-stage hydroponic tomatoes and target 1,500 PPM.
Step 3: Identify Your Nutrient Formulation
Check your fertilizer package for the N:P:K ratio. Common examples include:
- General Hydroponics Flora Series (recommends specific ratios for each stage)
- Maxi Series products (MaxiGro for vegetative stage)
- Two-part or three-part nutrient systems
Step 4: Calculate Required Nutrients
If growing medium leafy greens targeting 1.2 mS/cm EC, calculate:
- Convert EC to approximate PPM (typically 1 mS/cm ≈ 600 PPM, so 1.2 mS/cm ≈ 720 PPM)
- Reference your specific fertilizer’s recommended dosage (typically provided in ml/liter or grams/liter)
- Multiply the suggested dosage by your tank volume
- Add this calculated amount to your reservoir
Step 5: Monitor and Adjust
- Check EC/pH every other day initially
- If EC rises above target, plants uptake water faster than nutrients (add water)
- If EC falls below target, plants uptake nutrients faster than water (add nutrients)
- After initial adjustment (typically 3-5 days), EC stabilizes and requires weekly monitoring
Professional Nutrient Calculator Tools
Many manufacturers provide online calculators or feed charts that automate this process:
General Hydroponics Calculator
- Designed specifically for Flora Series nutrients
- Shows exact volumes for three-part system (FloraGro, FloraMicro, FloraBloom)
- Different recommendations for light, medium, and aggressive feeding
- Color-coded system for easy following
Hydroponic Research Calculator
- Accepts variable inputs for VEG+BLOOM combination products
- Adjusts calculations based on tank volume and target PPM
- Provides weekly breakdowns throughout vegetative phase
DIY Spreadsheet Method
- Create custom spreadsheet tracking your specific nutrient brand
- Input tank volume and desired PPM to auto-calculate fertilizer volumes
- Includes formulas for adjusting NPK ratios throughout vegetation
Nitrogen-Rich Nutrients for Maximum Vegetative Growth
Why Nitrogen Dominates the Vegetative Stage
Nitrogen (N) forms chlorophyll’s central component—the compound allowing plants to convert light into energy through photosynthesis. More nitrogen directly increases chlorophyll production, enabling superior photosynthesis rates and dramatically accelerating leaf and stem development.
Vegetative plants prioritize foliage expansion and stem elongation above all other growth processes. This constant leaf production requires enormous nitrogen quantities compared to flowering plants, which redirect energy toward reproductive structures rather than foliage.
Nitrogen-Rich Nutrient Sources for Hydroponics
Three-Part Nutrient Systems (Highest Control)
Three-part systems separate macronutrients and micronutrients into distinct bottles, allowing independent adjustment of nitrogen levels.
General Hydroponics Flora Series (affiliate link) remains the industry standard:
- FloraGro: Emphasizes nitrogen and potassium
- FloraMicro: Provides calcium, nitrogen, and trace elements
- FloraBloom: Shifts toward phosphorus and potassium (used primarily in flowering)
The Flora Series allows vegetative growers to combine FloraGro and FloraMicro in precise ratios, creating customized nitrogen emphasis. Most vegetative applications use 10-15 ml/liter FloraGro combined with proportional FloraMicro additions.
Two-Part Nutrient Systems (Good Balance)
Two-part systems combine grow and bloom concentrates, accepting less independent nutrient adjustment than three-part systems.
General Hydroponics MaxiGro (affiliate link) specifically targets vegetative growth:
- Optimized nitrogen emphasis for foliage expansion
- Balanced secondary nutrients for stem strength
- Single concentrated solution reduces measurement complexity
- Slightly less customizable than Flora Series but highly reliable
Organic Nitrogen Sources for Hydroponic Use
Some growers prefer naturally-derived nitrogen compounds:
Fish Emulsion: (affiliate link) High-nitrogen organic liquid providing immediate availability
- Nitrogen content: 5-9% (varying by brand)
- Unique amino acid profiles supporting plant vigor
- Distinctive odor may attract pests
- Slower breakdown than synthetic nitrogen in hydroponics
Worm Castings Extract: (affiliate link) Nitrogen from decomposed worm manure
- Nitrogen content: 2-5% (lower than fish but accompanied by beneficial microbes)
- Improves nutrient cycling when used periodically
- May contain beneficial bacteria promoting root development
- Less common in pure hydroponics but used in hybrid systems
Compost Tea: (affiliate link) Nitrogen from decomposed organic matter
- Nitrogen content: Highly variable, typically 1-3%
- Complex biology supports overall plant health
- Consistency problems in hydroponics (risk of clogging)
- Better suited for supplemental feeding than primary nutrient source
Nitrogen Ratios Throughout Vegetative Stage
Nitrogen requirements evolve as plants mature:
Very Early Vegetative (Weeks 1-2 Post-Seedling)
- Reduced nitrogen emphasis to prevent overly vegetative growth
- 50-70% of mature plant nitrogen targets
- Focus instead on moderate balanced nutrition
- Allows root systems to establish before peak foliage demands
Peak Vegetative (Weeks 3-6, depending on crop)
- Maximum nitrogen emphasis for aggressive foliage expansion
- 100-120% of standard nitrogen targets
- Nitrogen percentage in fertilizer reaches maximum sustainable levels
- Heavy leaf and stem growth during this period
Late Vegetative Transition (Week 7+ depending on crop and goals)
- Begin nitrogen reduction to prepare for transition phase
- Shift toward phosphorus and potassium emphasis
- Gradually decrease nitrogen from peak levels
- Prevents excess vegetative growth that delays flowering
Recognizing and Preventing Nitrogen Problems
Understanding both deficiency and toxicity prevents costly mistakes during the critical vegetative phase.
Nitrogen Deficiency Symptoms (Most Common Vegetative Issue)
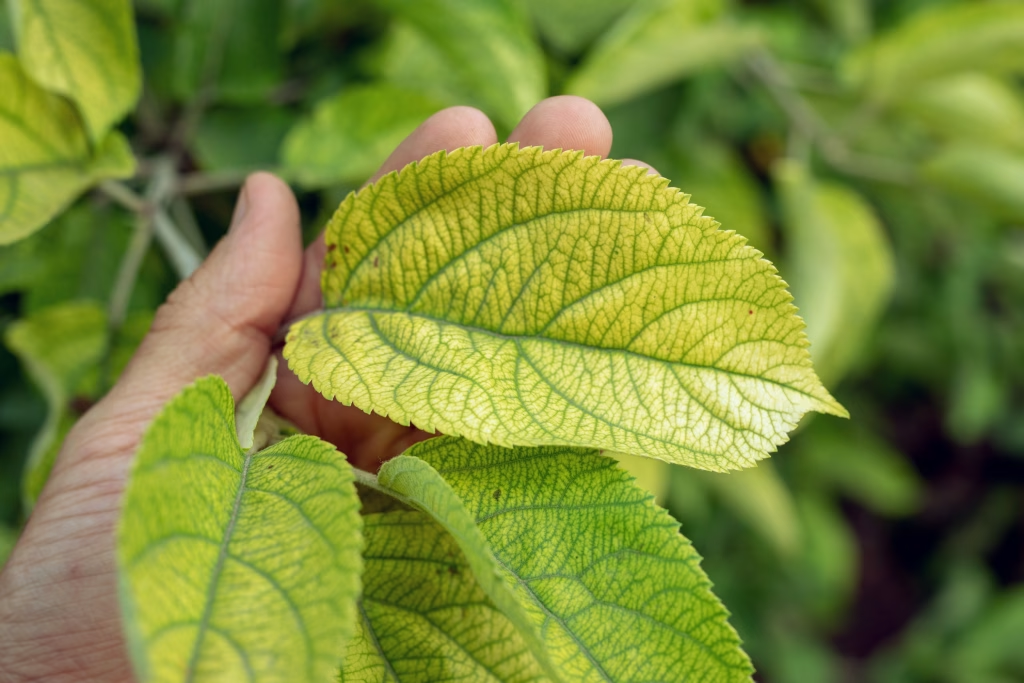
Nitrogen deficiency manifests consistently and distinctly:
- Lower/older leaves yellow first while upper leaves remain green (nitrogen’s mobility means plants rob nitrogen from mature leaves to feed new growth)
- Yellowing starts from leaf tips inward toward center
- Affected leaves eventually brown, die, and drop
- Overall plant growth slows dramatically
- Stems weaken and may discolor slightly purple or reddish
- Plant appears stunted with reduced vigor
The key diagnostic feature: deficiency always appears first on lower, mature leaves because nitrogen readily moves from old to new growth. If you see yellowing on new top growth, suspect other deficiencies (iron, magnesium, etc.).
Nitrogen Deficiency Causes in Hydroponics
- Inadequate nutrient solution concentration (EC too low)
- Nutrient imbalance blocking nitrogen uptake
- Excessive vegetative growth depleting nitrogen faster than available
- System leaks reducing total nutrient supply
Nitrogen Deficiency Solutions
- Check EC/PPM and increase if below target
- Verify pH remains 5.5-6.5 for optimal nitrogen availability
- If EC correct, perform water change to reset nutrient balance
- Reduce plant density allowing nutrients to service fewer plants
- For organic/natural systems, increase fish emulsion or nitrogen supplementation
Nitrogen Toxicity Symptoms (Excess Nitrogen)
Over-fertilization with nitrogen creates a different set of problems:
- Abnormally dark green foliage and intensely colored leaves
- Leaf tips curl downward (characteristic “clawed” appearance)
- Leaves develop strange cupping or curved shape
- Plant growth slows despite dark green appearance
- Yellowing leaves eventually die and drop
- Weak, underdeveloped root systems (nitrogen excess impairs root establishment)
- Delayed flowering when approaching transition
- Reduced nutrient absorption of other essential elements
- Eventual nutrient burn as salt accumulation occurs
Nitrogen Toxicity Causes in Hydroponics
- Excessive fertilizer application (EC too high)
- Inadequate water changes or nutrient solution maintenance
- Water uptake slower than nutrient uptake (common in cool environments)
- Prolonged feeding without solution changes
Nitrogen Toxicity Solutions
- Stop adding nutrients immediately
- Perform partial water change (25-50%) to dilute excess nitrogen
- Monitor EC daily for return to target range
- Return to normal feeding only after EC stabilizes
- For severe cases, perform complete system flush and restart
Strategic Nitrogen Feeding Through Vegetative Timeline
Week 1-2 After Seedling Stage (Establishment Phase)
- EC target: 0.8-1.0 mS/cm
- Focus on balanced nutrition rather than maximum nitrogen
- Allow roots to establish without stress from excess salts
- Nitrogen percentage: ~15-25% of mature levels
Week 3-6 (Peak Vegetative Growth)
- EC target: 1.2-2.0 mS/cm (varies by plant type)
- Maximize nitrogen for aggressive foliage expansion
- Push growth rate with high-quality lighting and adequate CO2
- Nitrogen percentage: 80-100%+ of maximum levels
- Monitor daily for deficiency or toxicity symptoms
Week 7+ (Pre-Flowering Transition, depending on crop)
- EC target: Maintain 1.2-1.8 mS/cm
- Begin nitrogen reduction by 10-20%
- Increase phosphorus and potassium emphasis
- Prepare plant for transition to reproductive growth
- Nitrogen percentage: 70-80% of peak levels
Essential Pruning Tools and Techniques
Why Pruning Matters During Vegetative Stage
Pruning during vegetation accomplishes several critical objectives:
- Promotes air circulation preventing mold and mildew in high-humidity hydroponic environments
- Directs energy toward strongest branches rather than weak growth
- Shapes plant architecture creating ideal canopy structures for light penetration
- Removes diseased material before pathogens spread throughout the system
- Increases branching by stimulating lateral bud development
- Manages plant height keeping plants within grow space constraints
- Improves light distribution ensuring all branches receive adequate exposure
Must-Have Pruning Tools for Hydroponic Growers
High-Quality Pruning Shears (Essential)
Professional-grade pruning shears represent the single most important pruning tool investment. Quality matters tremendously—dull blades crush tissue, creating entry points for disease and slowing healing.
Recommended Specifications:
- Sharp, stainless steel blades (prevents corrosion in humid hydroponic environments)
- Straight-edge blades (for precise cutting accuracy)
- 1/4 to 1/2 inch cutting diameter
- Ergonomic handles reducing hand fatigue during extended use
- Spring-loaded mechanism (reduces repeated cutting strain)
Top Professional Choices:
- Chikamasa B-500SRF Curved Scissors: (affiliate link) Japanese-engineered precision with lightly sprung jaws and metal construction. Industry favorite among professional growers.
- Corona FS 3214D ComfortGEL Leaf & Stem Micro Snips: Compact 1.75-inch precision blades perfect for delicate microgreens, herbs, and detailed pruning work.
- FLORA GUARD Garden shears – 8.2″ Straight Tip & 7.2″ Curved Blade pruning shears for gardening, ideal for precise trimming.
Budget-conscious growers can find acceptable pruning shears for $15-25. Professional-grade options typically range $35-60 but last years with proper maintenance.
Pruning Saws for Heavy Branches (Optional for Large Plants)
Fine-toothed pruning saws handle thick branches exceeding shear capacity. Most hydroponic systems don’t require saws, but growers maintaining large fruiting plants (18+ month tomato crops) may benefit from this specialized tool.
Sterilization Supplies (Critical for Disease Prevention)
Before and after pruning, sterilize all tools with:
- 70% isopropyl alcohol solution (most common)
- 10% bleach solution (1 part bleach to 9 parts water)
- Commercial tool sterilizers
This simple step prevents spreading pathogens between plants. Disease prevention through proper tool sanitation costs nearly nothing but saves entire crops if disease outbreak occurs.
Step-by-Step Pruning Techniques During Vegetative Stage
Technique 1: Topping (Maximum Growth Control)
Topping removes the main stem’s apical (top) shoot, triggering development of two new main colas from the topmost growth nodes.
When to Top:
- Wait until plant has 4-6 nodes (sets of leaves) minimum
- Too early topping shocks young seedlings, severely stunting growth
- Best performed during peak vegetative growth (week 3-5 for most crops)
How to Top:
- Locate the newest growth at the plant’s absolute top (the apical meristem)
- Using sterilized shears, cleanly cut 1/4 to 1/2 inch above the topmost node
- Cut should be clean and straight (dull shears crush tissue)
- Remove only the newest, smallest growth (excessive removal causes excessive stress)
- Leave 3-5 sets of intact leaves for immediate photosynthesis
Expected Results:
- Two new top colas develop from next lower node
- Colas grow evenly spaced, creating wider canopy
- Plant width increases dramatically while height growth temporarily pauses
- Recovery requires 1-2 weeks; growth resumes faster in established plants
- Multiple topping creates even wider canopy with 4+ colas
Advantages:
- Controls plant height in space-limited environments
- Creates incredibly uniform canopy with multiple equal colas
- Maximizes light exposure to all developing branches
- Widely used by professional growers
Disadvantages:
- More stressful than alternative techniques
- Requires longer vegetative period (extends timeline 3-4 weeks)
- Creates plant structures vulnerable to heavy bud weight (requires staking)
Technique 2: FIMing (Gentle Alternative to Topping)
FIMing (FIM = “F*** It, Mouth”) involves pinching off approximately 75% of the newest top growth, less aggressive than topping.
When to FIM:
- Perform when plant has 3-5 nodes developed
- Can be attempted slightly earlier than topping due to gentler approach
- Early to mid-vegetative stage optimal for fast recovery
How to FIM:
- Locate newest growth at plant top
- Using sterile shears or bare fingers, remove approximately 75% of the new growth tip
- Leave approximately 25% of the newest leaf nodes attached to main stem
- Cut should be clean but less precise than topping
Expected Results:
- Four to eight new growth shoots typically develop (vs. two with topping)
- Creates bushier, fuller plant with more development points
- Plant appearance looks strange immediately after FIMing (normal—don’t worry)
- Recovery typically slightly faster than topping
- Final canopy denser with more smaller colas
Advantages:
- Less shocking than topping
- Faster initial recovery
- Creates larger total number of branches
- Increases total bud sites (higher yields for some growers)
- Gentler on young plants
Disadvantages:
- Less predictable than topping (results vary)
- Creates more numerous smaller colas (less ideal for some applications)
- Still requires extended vegetative period (3-4 weeks)
Technique 3: Low-Stress Training (LST – Safest Option)
LST bends and secures branches to create a wider, more even canopy without removing plant material.
When to LST:
- Begin when plant has 6-8 inches height minimum
- Can continue throughout vegetative stage
- Even use during early flowering for gentler training
How to LST:
- Identify branches you want to redirect (typically longer main stems)
- Using soft garden ties, twine, or fabric strips (NOT wire), gently bend stem downward/sideways
- Secure bent stem to pot edge or grow container support
- Ties should be loose—never girdle the stem or restrict fluid flow
- Gradually increase bend angle over several days (dramatic immediate bending stresses plant)
- Check ties regularly as plant grows, adjusting as needed
Expected Results:
- Canopy flattens and spreads, creating more even light distribution
- Multiple side branches elevate toward light, becoming co-leaders
- Plant develops “X” or “plus-sign” shape instead of traditional pyramidal structure
- Minimal stress to plant (recovers within days)
- Allows continued vegetative growth without height extension
Advantages:
- Gentlest training method available
- No plant tissue removal (less shock)
- Can implement immediately without waiting
- Most effective for space-limited environments
- Works well combined with topping/FIMing
Disadvantages:
- Requires regular maintenance and tie adjustments
- Slower to create canopy changes compared to topping
- Less dramatic results than more aggressive techniques
- Labor intensive (requires more frequent adjustment)
Technique 4: Lollipopping (Canopy Cleaning)
Lollipopping removes lower branches and leaves that receive insufficient light and produce minimal fruit/bud.
When to Lollipop:
- Begin in mid-vegetative stage (week 3-4)
- Most effective on fruiting plants (tomatoes, peppers, cucumbers)
- Can continue into early flowering
How to Lollipop:
- Identify branches receiving minimal direct light (typically bottom 6-12 inches of plant)
- Remove entire small branches or leaf clusters entirely
- For very dense canopies, remove alternate leaf nodes rather than entire branches
- Start from plant bottom and work upward gradually
- Don’t remove excessive foliage in single session (maximum 30% per pruning)
Expected Results:
- Improved airflow through lower canopy preventing mold
- Enhanced light penetration to remaining branches
- Reduced transpiration demand (plant water consumption decreases)
- Better spray coverage if using foliar applications
- No direct growth benefit (mainly preventative/maintenance)
Advantages:
- Preventative disease management
- Improves air circulation
- Easy to understand and implement
- Minimal stress to plant
- Can continue into flowering stage
Disadvantages:
- Won’t increase yields (maintains them)
- Labor intensive if done frequently
- Removes some shade-tolerant plant material
- Must be careful not to over-prune
Universal Pruning Guidelines
Regardless of technique, follow these universal rules:
- Sterilize all tools before and after use—absolutely non-negotiable
- Do not prune more than 1/3 of total plant material at any single session
- Always cut above a node (leaf joint)—ensures regrowth from desired location
- Never prune sick or stressed plants—wait until health improves
- Monitor plants after pruning for stress symptoms (wilting, browning, slowed growth)
- Adjust nutrient levels after heavy pruning—support regrowth with increased feeding
- Never prune during flowering—wait for vegetative stage
- Allow recovery time between aggressive pruning techniques (minimum 1 week between topping/FIMing)
Nutrient Optimization: Beyond Basic Feeding
Fine-Tuning EC and Nutrient Strength
Most growers follow standard EC recommendations but never optimize for their specific conditions. This represents enormous untapped efficiency.
Factors Affecting Optimal EC:
- Plant size (larger plants require higher EC)
- Growth stage (early veg tolerates lower EC, peak veg needs highest)
- Environmental conditions (high temperature increases water uptake, high humidity decreases)
- Light intensity (plants can’t utilize nutrients beyond photosynthesis capacity)
- Plant genetics (different cultivars have different feeding preferences)
- Growing medium type (hydroponic vs. aquaponic vs. hybrid systems)
Optimization Strategy:
Rather than static EC values, think in terms of plant response. Optimal EC exists at the point where:
- Plants exhibit dark green color without excessive darkness
- Leaf tips show no burning or deficiency symptoms
- Growth proceeds at maximum sustainable rate
- Nutrient solution stabilizes without major EC fluctuations
Testing New EC Levels:
When optimizing, change EC gradually:
- Start at documented optimal range for your plant type
- Observe plant for 3-5 days to assess response
- If plants show deficiency (light color, slow growth), increase EC by 0.1-0.2 mS/cm
- If plants show toxicity (dark color, tip burn), decrease EC by 0.1-0.2 mS/cm
- Once optimal found, document exact EC and conditions
- Use documented optimal as baseline for future crops
pH Management During Vegetative Growth
pH affects nutrient availability more than any other factor. Maintain 5.5-6.5 for optimal uptake of all essential elements.
Vegetative Stage pH Targets:
- Optimal: 5.8-6.2 (absolute sweet spot for balanced nutrient availability)
- Acceptable range: 5.5-6.5
- Outside acceptable range causes nutrient lockout despite adequate nutrient presence
Why pH Drifts:
- Nutrient uptake naturally acidifies or alkalinizes solution over time
- Plant growth and metabolism alter pH
- Water minerals influence pH trajectory
Stabilizing pH:
- Check pH every 2-3 days, especially during first week after solution preparation
- If pH rises above 6.5, nutrients become less available (deficiencies appear)
- If pH drops below 5.5, nutrients become too available (toxicity symptoms occur)
- Make small pH adjustments (0.2-0.3 units maximum) rather than dramatic changes
- Allow 24 hours for adjustments to fully take effect before re-testing
pH Adjustment Tools:
- pH down (phosphoric acid or similar): Most common for lowering
- pH up (potassium hydroxide or similar): For raising
- Better to stabilize through preventative nutrient management than reactive pH adjustment
Dissolved Oxygen and Root Health
Oxygen availability during vegetative stage directly determines maximum growth rate. Without adequate DO (dissolved oxygen), roots cannot absorb nutrients despite perfect nutrient solution composition.
Optimal Dissolved Oxygen Levels:
- Target: 8-12 mg/L during vegetative stage
- Minimum acceptable: 6 mg/L (growth slows below this)
- Critical threshold: Below 3 mg/L (root rot begins)
Oxygen Depletion Symptoms:
- Slow growth despite adequate nutrients
- Yellowing leaves despite correct pH and EC
- Foul odor from growing medium (anaerobic bacteria producing sulfur compounds)
- Sudden plant collapse in extreme cases
Maintaining Dissolved Oxygen:
- Ensure water circulation with air stones or water circulation pumps
- Air stones must run continuously (never turn off aeration)
- Cold water holds more oxygen than warm water (maintain 65-72°F)
- Perform partial water changes every 2-3 weeks (refreshes DO)
- Consider air pump redundancy (backup battery or secondary pump)
Secondary Nutrients: Calcium, Magnesium, and Sulfur
While nitrogen, phosphorus, and potassium grab attention, secondary nutrients prove equally critical for optimal vegetative growth.
Calcium (Ca)
- Supports cell wall development and stem strength
- Deficiency: Tip burn on new leaves, weak stems
- Sources: Most quality hydroponic nutrients include sufficient calcium
- Concentration target: 40-100 ppm in final solution
Magnesium (Mg)
- Core component of chlorophyll molecule
- Deficiency: Yellowing between leaf veins on lower leaves (distinct from nitrogen deficiency)
- Sources: Often present in hydroponic nutrients, or add separately as magnesium sulfate (Epsom salt)
- Concentration target: 30-60 ppm in final solution
Sulfur (S)
- Supports amino acid and protein synthesis
- Deficiency: Rare in hydroponics, entire plant yellows starting from new growth
- Sources: Present in most complete hydroponic nutrient solutions
- Concentration target: 30-60 ppm in final solution
Maintenance Approach:
Use complete hydroponic nutrient formulations (like Flora Series or Maxi Series) that include proper secondary nutrient ratios. Most supplementation needs don’t require special attention during vegetative stage when using quality complete nutrients.
Micronutrient Monitoring
Micronutrients (iron, manganese, zinc, boron, molybdenum, copper) are needed in tiny quantities but prove essential.
Iron (Fe): Chlorophyll production
- Deficiency: Yellowing between veins on new growth (high pH is often cause)
- Solution: Lower pH to 5.5-6.5; rarely need supplementation in fresh hydroponic solution
Manganese (Mn): Photosynthesis and enzyme function
- Deficiency: Interveinal chlorosis on young leaves (yellowish between darker veins)
- Solution: Check pH first; if correct, increase Mn slightly
Zinc (Zn): Enzyme production and growth hormone synthesis
- Deficiency: Stunted growth, yellowing between veins
- Solution: Verify pH and EC correct before supplementing
Boron (B): Cell division and growth
- Deficiency: Twisted, thick new leaves; poor flower development
- Solution: Rare in hydroponics with quality complete nutrients
Micronutrient Strategy:
- Use quality complete nutrient formulations providing all micronutrients
- If deficiency symptoms appear, first verify pH (5.5-6.5) and EC (target range)
- Most apparent deficiencies actually result from pH-lockout rather than true deficiency
- Only supplement specific micronutrients after confirming pH and EC optimal
Common Vegetative Stage Problems and Solutions
Slow Growth Despite Adequate Nutrients and Light
Root causes to investigate (in order of likelihood):
- Dissolved oxygen too low: Check aeration system—air stones running continuously?
- Temperature too high or too low: Verify 70-75°F range; outside this slows metabolism
- pH outside optimal range: Verify 5.5-6.5 (most common hidden cause)
- Light quality or placement: Verify adequate light (minimum 18 hours, 400+ PPFD)
- Overcrowding: Too many plants competing for nutrients—thin out system
- Root damage or disease: Inspect root health; odor indicates bacterial/fungal issues
Solution method:
- Check each factor systematically starting at top of list
- Usually find root cause within first three factors
- Make single adjustment at a time, allowing 3-5 days to assess response
Yellowing Leaves During Vegetative Stage
Diagnostic approach depends on location of yellowing:
Lower/older leaves yellowing (most common):
- Likely cause: Nitrogen deficiency
- Solution: Increase EC by 0.1-0.2 mS/cm; monitor response over 3-5 days
- If no improvement, check pH (5.5-6.5) and do partial water change
New/upper leaves yellowing:
- Likely causes: Iron deficiency (interveinal pattern), magnesium deficiency (between veins), or pH lockout
- Solution: Decrease pH to 5.5-6.2; often resolves issue
- If persists, add iron supplement or magnesium (Epsom salt)
Entire plant light green/yellow:
- Likely cause: Insufficient nitrogen or low light
- Solution: Increase EC and verify light levels adequate
Nutrient Burn or Toxicity Symptoms
Indicators:
- Dark green leaves with abnormal darkness
- Leaf tips brown and burned-looking
- Leaves curl downward (claw-like appearance)
- Growth slowing despite plant vigor
Immediate solution:
- Stop adding nutrients
- Check EC (should be reduced)
- If EC elevated above target, perform 25-50% water change
- Resume normal feeding only after EC returns to target range
- Monitor daily for improvement (typically visible within 3-5 days)
Weak Stems and Leggy Growth
Causes:
- Insufficient light (most common)
- Too much nitrogen without adequate phosphorus and potassium
- Excessive plant density with crowding
Solutions:
- Move light closer (verify PPFD adequate—400+ minimum)
- Increase light duration (extend to 18-24 hours)
- Check nutrient ratios (increase P and K relative to N)
- Thin out plant density allowing more space per plant
- Increase air circulation promoting stronger stems
Pests During Vegetative Stage
Common hydroponic pests:
- Whiteflies: Sticky traps, reflective mulch, neem oil spray
- Spider mites: Humidity control, strong air circulation, neem oil
- Fungus gnats: Water management (reduce standing water), sand layer on medium surface
- Root rot organisms: Verify oxygenation, maintain 65-72°F water temperature
Preventative approach:
- Maintain clean growing environment
- Isolate new plants before adding to system
- Monitor regularly (inspect underside of leaves)
- Act immediately upon first pest sighting
- Remove affected leaves/branches before treating
Conclusion: Mastering the Vegetative Stage Foundation
The vegetative stage represents far more than simply waiting for plants to grow larger. This critical phase determines your final harvest’s quality, quantity, and timeline. Growers who master vegetative optimization enjoy:
- Faster harvests through accelerated growth rates
- Stronger plants with superior disease resistance
- Higher yields from well-developed branch structures
- Better health through proper nutrition management
- Reduced losses through vigilant monitoring and proactive problem-solving
Throughout this guide, we’ve explored the complete framework for vegetative excellence: from understanding growth timelines and calculating precise nutrient amounts, to implementing strategic pruning techniques and fine-tuning environmental parameters.
Remember that optimization is iterative. Your first vegetative cycle might not be perfect—document everything, learn from results, and refine your approach for the next crop. The vegetative plants you grow today become the flowering plants of tomorrow, making this stage the genuine foundation of cultivation success.
Key Takeaway: Plants don’t exceed their vegetative potential. A weak, poorly-managed vegetative phase cannot transform into excellent flowering results. Invest your attention, nutrients, and care into the vegetative stage, and your entire operation benefits.
Frequently Asked Questions
Q: How long should I keep plants in the vegetative stage?
A: Duration depends on your goals. Most hydroponic growers maintain vegetation for 4-8 weeks indoors, though autoflowering strains require only 2-4 weeks. Extend vegetative period when growing fewer plants for larger individual sizes, or shorten timing when prioritizing rapid harvests or growing multiple crops annually.
Q: Can I use flowering nutrients during vegetative stage?
A: Not recommended. Flowering nutrients emphasize phosphorus and potassium while reducing nitrogen. Using these during vegetation would create nitrogen deficiency, stunting foliage development when plants need maximum growth. Use vegetative-specific nutrients when available; only switch to flowering formulations after initiating transition.
Q: What’s the best light schedule for maximum vegetative growth?
A: 24-0 (continuous light) produces fastest growth but increases electricity costs. 18-6 (18 hours light, 6 hours dark) balances rapid growth with energy efficiency and is recommended for most growers. Some growers successfully use 20-4 schedules for compromise approach.
Q: Do I need to change nutrients during vegetative stage?
A: Not mandatory, but highly recommended. Perform partial water changes (25-33% volume) every 3-4 weeks, or complete water changes every 4-6 weeks. This refreshes nutrient balance, replenishes oxygen, and removes accumulated salts that can cause lockout. Fresh nutrient solution maintains optimal growing conditions.
Q: Can pruning during vegetative stage increase yields?
A: Pruning doesn’t directly increase final yields, but strategic pruning creates superior architecture for better light distribution and increased bud sites, potentially improving yields indirectly. The primary benefit is manageability and disease prevention rather than direct yield increase.
Q: What’s the minimum recommended light intensity for vegetative growth?
A: 400 PPFD (photosynthetic photon flux density) represents the minimum threshold for acceptable vegetative growth. Optimal vegetative growth occurs at 600+ PPFD. Higher intensities accelerate growth but increase electricity costs—find the balance suiting your budget and timeline.
Q: Is it normal for vegetative leaves to drop occasionally?
A: Occasional lower leaf loss is normal as plants mature and redirect resources. However, if numerous leaves yellow and drop within days, investigate nitrogen deficiency, pH issues, or oxygen problems. Consistent leaf loss indicates problems requiring attention.
Q: Can I transition to flowering without the full vegetative period?
A: Technically yes, but not recommended. Plants need adequate vegetative growth to establish strong root systems and develop sufficient branch structure for flowering. Transitioning too early results in smaller plants with fewer bud sites and reduced final yields. Allow minimum 3-4 weeks vegetative growth for best results.
This comprehensive guide provides the exact strategies and techniques needed to optimize vegetative growth in any hydroponic system. Apply these principles consistently, monitor your plants carefully, and adjust based on observed results. Your dedication during the vegetative stage directly determines harvest success.
Share this:

Discover more from Soil Free Harvest
Subscribe to get the latest posts sent to your email.