Flood and Drain Grow Bed Design: How to Size and Tune Bell Siphons
A flood and drain grow bed works best when the bell siphon is sized to the bed, the pump, and the media depth, not guessed from a generic kit. For most home systems, a well-matched 1 inch to 2 inch siphon, a stable inflow, and a media depth around 8 to 12 inches will give the most reliable cycle behavior.
TL;DR: If your siphon will not start, increase inflow or reduce losses; if it will not stop, reduce inflow or improve the air break. For leafy greens and herbs, flood and drain is one of the easiest and most forgiving hydroponic systems when the water level, media depth, and drain diameter are balanced correctly.
Flood and drain systems (also called ebb and flow) are among the most popular and productive ways to grow. They are fantastic for leafy greens and herbs, offering a forgiving environment that makes them a great choice for beginners. But to work effectively, they need a crucial piece of plumbing: the bell siphon.
A bell siphon automates the vital cycle of filling the grow bed and then draining it completely to refresh the root zone with oxygen. It works brilliantly, but only if the parts are sized correctly for your specific grow bed, pump, and media depth. This isn’t a component you want to guess with a generic kit.
For most backyard systems, a well-matched siphon that balances the flow rate and plumbing sizes will give you the most reliable, repeatable results.
What Exactly Is a Bell Siphon and How Does It Work?
To a beginner, a bell siphon might look complex, but it actually consists of a few key parts. Understanding these parts is the secret to building and troubleshooting your system.
Let’s break down the assembly. Inside your grow bed, you will have three main components sitting together like Russian nesting dolls.
The Three Key Inside Parts
- The Gravel Guard (Media Guard): This is the outermost piece, typically a large-diameter slotted pipe. Its job is purely protective: it keeps your growing media (like clay pebbles or lava rock) from clogging up the delicate siphon inner workings.
- The Bell: This sits inside the gravel guard. It’s a wider-diameter pipe that is capped at the top and has openings or notches at the bottom to let water in. When the grow bed floods, this cap traps air inside the bell.
- The Standpipe: This is the innermost vertical pipe. The top of this pipe sets the maximum water level for your entire grow bed. When the rising water spills over the standpipe, the magic happens.
The Unsung Hero: The Bulkhead Fitting
Before you place your standpipe, you need a way to get the water through the bottom of your grow bed without creating a massive leak. This is the role of the bulkhead fitting.
A bulkhead fitting is a specialized plumbing seal designed to create a watertight pass-through hole in a container.
It’s a critical component. You drill a single hole in the bottom of your grow bed, insert the bulkhead fitting body, and then use its locknut (often with a rubber gasket) to compress and create a durable, waterproof seal against the container’s surface.
Once the bulkhead is secure, the Standpipe fits into it from the top (inside the grow bed), and your external drainage plumbing (elbows and outlet pipe) attaches to the bottom (outside the grow bed).
The Complete Process: Flood and Drain
- Flood: A water pump continuously fills the grow bed with nutrient solution. The water rises around the standpipe and under the capped bell. Roots are bathed in nutrients.
- Siphon Starts: When the water finally reaches the very top of the Standpipe, it begins to spill over and rush down the drain. This rapid movement, combined with the restriction of the bell dome, creates a vacuum that “primes” the siphon. Suddenly, water is being sucked out at a incredibly fast rate.
- Drain: The siphon drains the entire grow bed, providing fresh oxygen access to the now-aerated root zone.
- Siphon Breaks: Once the water level gets below the notches at the bottom of the Bell, air is sucked in. This influx of air “breaks” the vacuum. The gurgling sound of a successful siphon break means the drain phase is over, and your continuously running pump will begin to refill the bed.
Key Troubleshooting and Sizing Advice
The whole system only works reliably when everything is in balance. Most beginners find that their siphon fails in one of two ways.
Quick Troubleshooting Guide
- My siphon will not start! (Grow bed overflows)
- The Cause: The water is entering too slowly. Instead of creating a rapid rush that seals the drain and primes the siphon, it just trickles down the pipe, and your pump keeps filling faster than it can drain.
- The Fix: Increase the water inflow from your pump (use an inline valve). If that doesn’t work, reduce restrictions in your drain geometry (check for too many horizontal pipe runs).
- My siphon will not stop! (Continuous trickling, never refills)
- The Cause: The water is entering too fast. The vacuum is so strong that even after it empties the bed, the pump keeps feeding it faster than air can break the siphon.
- The Fix: Reduce the water inflow from your pump. Alternatively, improve the air break path (check if your bell’s air notches are too small or clogged).
Sizing Your First System
For beginners, a practical starting point for sizing a bell siphon is to base it on your planned drain size (which is determined by your bulkhead). A useful rule of thumb is a 2:1 ratio: the bell diameter should be approximately twice the riser (standpipe) diameter.
A 1-inch drain is the safest starting point for most average home grow beds (those in the 4 to 8 square foot range). Larger beds need larger drains so the siphon can empty the bed quickly enough to break cleanly on every cycle.
A common practical depth range is 8 to 12 inches of media for backyard flood and drain beds. Deeper beds give you more room to anchor heavier plants like peppers and a larger biofilter effect. In my experience, 12 inches is the sweet spot for a first system.
Which plants and systems work best?
Flood and drain is best for leafy greens, herbs, strawberries, peppers, cucumbers, and compact fruiting plants. Leafy greens and herbs are the easiest crops because they tolerate the common hydroponic pH range of about 5.5 to 6.5 and do well in the moderate EC range many home growers use.
It also works well in aquaponics, greenhouse beds, and indoor grow rooms where a periodic wet dry cycle improves root oxygenation. In hotter climates, flood and drain can buffer temperature swings better than some constantly wet systems, though the reservoir still needs to stay cool and oxygenated.
How do you size a bell siphon?
Sizing starts with the grow bed volume, the media depth, and the pump flow entering the bed. A useful rule from practical aquaponics guidance is a 2:1 ratio of bell size to drain size, meaning the bell diameter is about twice the riser diameter.ctahr.hawaii+1
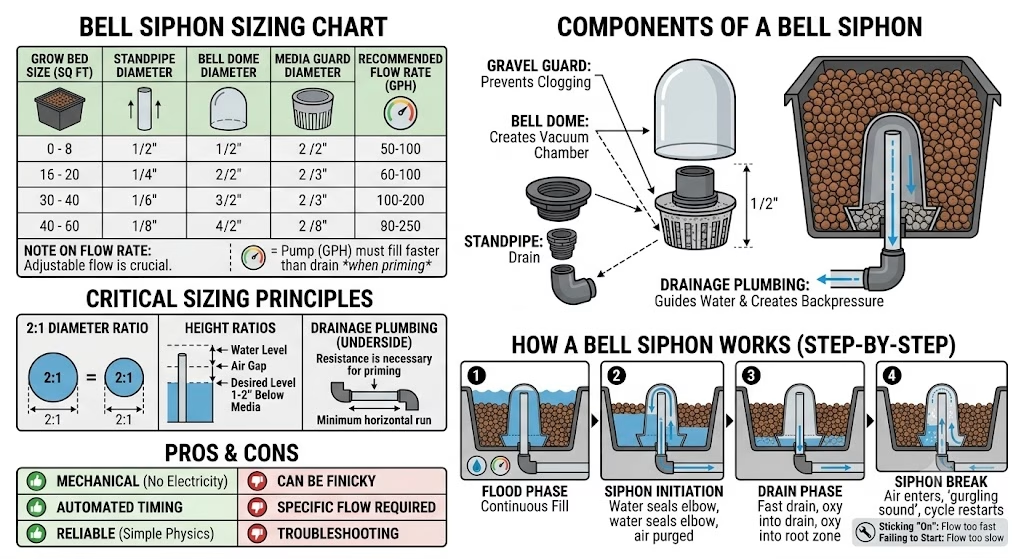
Common sizing patterns from field guides look like this:
| Grow bed scale | Typical drain size | Typical bell/riser pairing |
|---|---|---|
| Small bed or tote | 1/2 inch to 3/4 inch bulkhead | Around 1 inch bell, 1/2 inch riser |
| Medium home bed | 1 inch bulkhead | Around 2 inch bell, 1 inch riser |
| Large bed | 1 1/2 inch to 2 inch bulkhead | Around 3 inch bell, 1 1/2 inch riser |
For most home grow beds, a 1 inch drain is the safest starting point because it balances drain speed and tuning flexibility. Larger beds need larger drains so the siphon can empty the bed fast enough to break cleanly.
What size grow bed should you build?
A common practical depth range is 8 to 12 inches of media for backyard-style flood and drain beds, with many growers preferring 12 to 18 inches when they want more root volume and a stronger biofilter effect. Shallow beds can work for lettuce and herbs, but deeper beds give you more room to tune flood height and improve plant stability.
In my own style of build planning, I treat 12 inches as the sweet spot for a first system because it gives enough room for roots, enough thermal mass, and enough siphon tolerance to make troubleshooting easier. If you are growing heavier crops like peppers or larger basil plants, the extra depth also helps anchor the root zone.
What materials and tools do you need?
A dependable build needs simple parts, but the sizes matter. Using the right bulkhead and pipe diameter makes tuning much easier later.
Materials and tools
- Grow bed or tote.
- Food-safe liner or preformed bed.
- Bulkhead fitting.
- Standpipe PVC.
- Bell pipe PVC.
- Gravel guard or screen.
- Pump and tubing.
- Growing media such as expanded clay, lava rock, or similar inert media.
- Drill, hole saw, tape measure, marker, saw, and deburring tool.
How do you build and tune it?
How-To: Build and tune a bell siphon for a flood and drain grow bed
Description: Build a grow bed drain that floods consistently, drains completely, and breaks the siphon cleanly on every cycle.
Materials/Tools: Grow bed, bulkhead fitting, standpipe PVC, bell PVC, gravel guard, pump, tubing, drill, hole saw, saw, marker, tape measure, deburring tool, media.
- Measure the target flood height.
Decide how high you want the water line to sit below the media surface. For most media beds, a flood height that stays below the top layer helps reduce algae and keeps the upper root zone from staying saturated. - Set the standpipe height.
Cut the standpipe so the flood line lands at your chosen depth. The standpipe controls maximum water height, so this is the first dimension to get right. - Choose the bulkhead and drain size.
Use a 1 inch drain for medium home systems, then move larger only if the bed is oversized or drains too slowly. Bigger beds usually need bigger drains to avoid weak or inconsistent siphon action. - Build the bell and cap.
The bell should fit over the standpipe with enough clearance for water to flow freely underneath. A 2:1 bell to riser ratio is a common starting point, and the bell must be tall enough to fully cover the standpipe during the flood cycle. - Add the gravel guard.
Surround the siphon with a guard so media cannot clog the intake. Debris, roots, and buildup are common causes of weak draining and failed siphon breaks. - Start with moderate pump flow.
Aim for a flow rate that lets the bed fill in a predictable time, often somewhere in the 15 to 30 minute flood cycle range for many home setups. If the pump is too small, the siphon may never start; if it is too large, the siphon may not break cleanly. - Test the start point.
Watch for the moment the water reaches the standpipe and begins a rapid drain. If it only trickles, the inflow is likely too low or the outlet geometry is too restrictive. - Test the stop point.
The siphon should drain hard, then stop with a clean air break or burp. If it keeps running, reduce inflow, improve the air entry path, or adjust the bell height and outlet geometry. - Fine tune in small steps.
Make one change at a time, then wait through several full cycles. This is the fastest way to find the sweet spot without chasing multiple variables at once.
How do you tune the siphon?
Tuning is mostly about matching inflow to drain geometry. A siphon that never starts usually needs more inflow, while one that never stops usually needs less inflow or a cleaner air break.
Useful tuning ranges for many home systems are:
- pH: 5.5 to 6.5 for most crops.
- EC: about 1.2 to 2.0 mS/cm for leafy greens and herbs, higher for fruiting crops.
- Media depth: 8 to 12 inches for compact beds, 12 to 18 inches for deeper root crops and more buffering.
The goal is not perfect numbers on day one. The goal is a repeatable cycle that floods the bed fully, drains it completely, and then pauses long enough for oxygen to recharge the root zone.
What are the benefits and drawbacks?
| Factor | Benefits | Drawbacks |
|---|---|---|
| Root oxygenation | Great wet dry cycle, strong oxygen access | Can fail if siphon tuning is off |
| Crop flexibility | Works for greens, herbs, strawberries, peppers, and some cucumbers | Large fruiting crops need more support and nutrients |
| Simplicity | No timer needed when siphon is tuned well | Plumbing must be sized carefully |
| Maintenance | Easy to inspect and clean | Roots, debris, and media fines can clog it |
From a grower perspective, the main advantage is reliability once it is dialed in. The main drawback is that a bad pump choice or wrong drain size can make the whole system feel temperamental.
How do you maintain it?
A flood and drain bed stays reliable when you inspect the siphon and media regularly. Check for root intrusion, media fines, and mineral buildup around the standpipe and outlet.
Good routine maintenance includes:
- Rinse or clear the gravel guard.
- Check that the pump still provides consistent flow.
- Watch for changes in flood height after transplanting.
- Confirm the siphon still starts and stops in the same cycle window.
- Test pH and EC regularly so crop stress does not get mistaken for plumbing trouble.
What problems happen most often?
The most common problems are siphon not starting, siphon not breaking, and slow or partial draining. These usually trace back to flow rate, standpipe height, or a clogged drain path rather than a mysterious design flaw.
Quick fixes often look like this:
- Not starting: Increase inflow or reduce losses in the feed line.
- Not stopping: Reduce inflow, improve the air break, or check bell height.
- Trickling instead of dumping: Recheck the ratio of bell to riser and the outlet path.
- Inconsistent cycles: Clean debris and keep pump output stable.
What is the best use scenario?
Flood and drain is best when you want a low-tech, resilient system for compact crops. It is a strong choice for apartment gardeners, hobby greenhouse growers, and beginners who want an easier path than constantly pumped drip systems.
It is especially good for:
- Leafy greens.
- Basil, mint, cilantro, and similar herbs.
- Strawberries.
- Peppers in modest container sizes.
- Small cucumbers with support.
It is less ideal for very large root crops, extremely heavy fruiting plants, or setups where the grower cannot inspect plumbing often. In those cases, drip or Dutch bucket systems may be easier to manage at scale.
FAQ
How much does a flood and drain grow bed cost?
A small DIY system can be built on a modest budget if you already own a pump and container. Costs rise quickly when you add quality bulkheads, a stronger pump, and better media, so the siphon hardware is only part of the total budget.
Is a bell siphon hard to build?
It is not hard to build, but it is easy to size incorrectly on the first try. The plumbing is simple; the tuning is where beginners usually need patience.
What is the biggest mistake beginners make?
The most common mistake is choosing a pump or drain size that does not match the bed. Too little inflow prevents the siphon from starting, while too much inflow can prevent it from stopping.
How long does it take to see results?
Leafy greens often show visible growth within a couple of weeks, and many can be harvested in roughly 4 to 8 weeks depending on variety and light. Fruiting crops take longer and need tighter nutrient management.
Can I use this system indoors?
Yes, and it is a strong indoor option because it is compact and easy to automate once tuned. You still need good lighting, airflow, and a reservoir that stays clean and stable.
Why does my siphon keep gurgling?
Gurgling usually means the siphon is close to working but not fully balanced. That often points to flow that is slightly off, a poor air break, or a drain path that is too restrictive.
What plants should I avoid?
Very large, aggressive root crops and oversized fruiting plants can outgrow small flood and drain beds. Tiny shallow beds are also a poor fit for crops that need more root room, support, or nutrient intensity.
Do I need a timer?
A properly tuned bell siphon does not need a timer for the flood cycle itself. Some growers still use timers for the pump in special setups, but the siphon is meant to automate the drain phase.
How often should I check the system?
Check it daily at first, then at least a few times a week once it proves stable. The biggest risks are slow clogging, changing root mass, and pump drift over time.
What water quality is best?
Use clean, low-chlorine water whenever possible, then manage pH and EC according to crop type. For most hydroponic crops, a pH around 5.5 to 6.5 is the practical target range.
Author note
I write from the perspective of practical indoor and urban growing, with roots in Phoenix, Arizona and current experience in Central Michigan. That mix matters because hot, dry systems demand different tuning than cooler northern setups, especially for reservoir stability and plant transpiration. My focus is on hydroponic methods that are simple enough for beginners but still technically sound for serious hobby growers.
Share this:

Discover more from Soil Free Harvest
Subscribe to get the latest posts sent to your email.